
First off, thanks for purchasing our Cradle Rack. We hope it’ll be a trusted part of your cycling setup and that you love it for many years to come. The rack has a broad array of alignment options, and we hope you’ll find that setting up your new rack is both rewarding and straightforward.
Visual Learner? We’ve got you covered! Just below, you’ll find a comprehensive assembly video that will guide you through each step with visual cues. It’s an easy-to-follow, step-by-step walkthrough tailored just for you.
Prefer to Read? No problem! Dive into our detailed written instructions below the video. They are designed to be clear, concise, and user-friendly, ensuring you have all the information you need at your fingertips. That said, we aren’t technical writers, so if a question comes up or you have an idea for clarity, let us know at [email protected].
Cradle Installation
A Friendly Reminder: Grease Your Bolts! Remember, to ensure the longevity and optimal performance of your stainless steel bolts, always apply grease before assembly. This is crucial to avoid galling and cold welding. Assembling the Cradle without grease could lead to damaged threads, which is not covered under warranty.
Pro Tip: Assemble the rack before mounting it to your bicycle. This makes adjustments far easier to manage. However, don’t worry if you decide to mount it first; adjustments are still doable, just a tad more tedious.
Assembling the Cradle
Orientation Guidelines:
- The Stem’s Back: This refers to where it fits over the steerer.
- The Stem’s Front: Where it bolts to the Deck.
- Drive-Side: Identified by the counterbored holes.
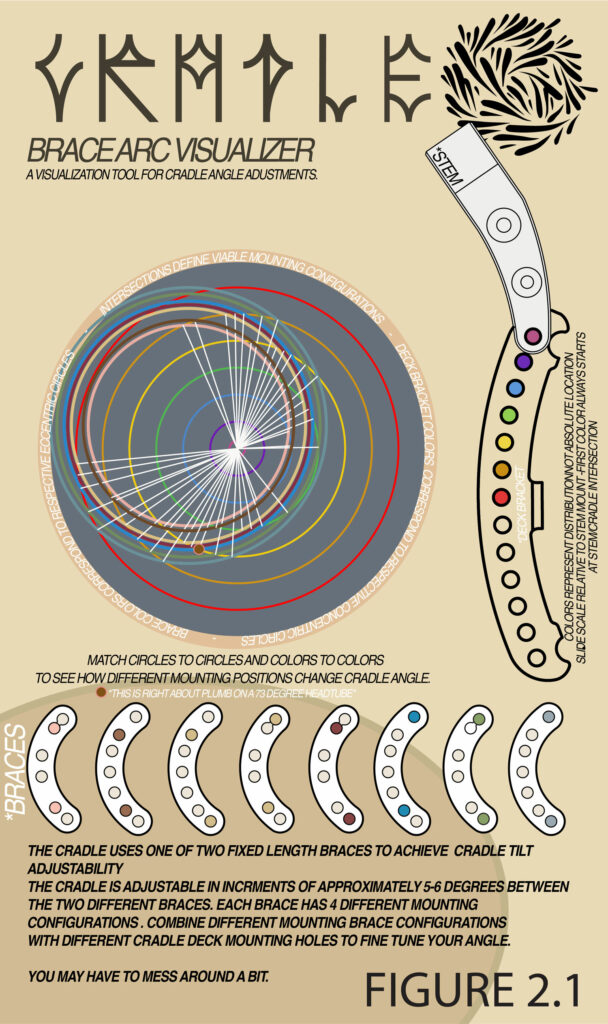
Understand the Cradle Angle
The cradle has many different positions (Height and Angle) that are created with a mix of bolt placement on the brace (see Fig 2.2) as well as placement on the rack (See animation). Keep this in mind with the instructions below.
Assembly Steps
- Install the M6 bolt into the rear-most hole on the drive side of the Stem and finger tighten into the m6 threads
- Install one of the Braces inside the inner slot of the stem and affix in place with the M5x16mm bolt and lock nut. (Grease your bolts!) Do not fully tighten yet. (Different brackets and different hole placements dictate platform angle. See Figure 2.2&2.3)
- Install the Cradle Deck so that the flanges sandwich the Stem and secure in place with one M5x12mm bolt and washer on either side. (Powdercoat buildup and welding distortion made some holes a bit of a tight fit. If you don’t mind a little scuff in paint/anodizing, there is no harm in using some elbow grease to line up stubborn holes.) Leave bolts loose for adjustment. (Different Deck Flange mounting holes will adjust height of the rack independent of angle.)
- Tilt the Cradle Deck so that your chosen Brace hole lines up with the Deck’s corresponding hole, then install the spacers and final bolt. The 10mm spacer and 18mm spacer should fit on the drive side and non drive side of the Brace respectively.
- Install one washer on the M5x45mm bolt then feed through the spacers, brace, and Deck flanges. Install the final washer then lock nut. (Grease your bolts!)
- Tighten and check all bolts.


Installing the Cradle
- Remove your Handlebar cockpit and the 20mm of spacers that the Cradle will replace.
- Move spacers around as necessary.
- Slide the Cradle Stem over your steerer tube, reinstall your Handlebar cockpit, adjust your headset preload, and tighten your handlebar stem.
- Align the Cradle so it is perpendicular to the centerline of the tire, then tighten the M6 Bolt on the Stem to clamp your Cradle in place.
- Check that all bolts are tight before riding.
Important: RACK HARDWARE CAN LOOSEN AFTER INSTALLATION, IT IS CRITICAL TO CHECK THE TIGHTNESS OF ALL BOLTS REGULARLY, IF YOU DO NOT DO THIS THERE IS A RISK OF SERIOUS INJURY OR DEATH.
Troubleshooting
Cradle is running into handlebar/stem:
- Use a higher mounting hole on the Deck Bracket flange to lower the rack. (Figure 4)
- Put a spacer between Cradle stem and Handlebar stem
- Adjust the angle of the Deck (Figure 2&3)
Cradle is running into tire / head tube:
- Adjust the angle of the Deck (Figure 2&3)
- Adjust the height of the Deck (Figure 4)
Stem won’t fit into the Deck Bracket:
- Due to some powder buildup and unforeseen welding distortion, some holes, particularly the topmost and bottommost holes, are a bit tight.
- If you can get away with it, try another mounting opportunity
- Feel free to put in a little more elbow grease. You may scratch the powder or anodizing, but you won’t do harm to the Cradle.
- If you think your fit is particularly egregious, holler at me and let’s find a solution! I didn’t realize the issue on some of them in time but I want you to be stoked and satisfied, even with first batch oversights. Regardless, I’m confident that once installed, It’ll all be rigid as heck and you will be stoked!